")
Part 1 — Understanding the Process Before You Touch the Jack
Changing a tire is one of those skills many drivers assume they will “figure out when needed.”
In reality, the moment a flat happens—on the roadside, in bad weather, late at night—is the worst possible time to learn. Knowing how to change a tire on a car is not about mechanical expertise; it is about preparation, awareness, and calm execution.
Despite how common driving is, none of these people know how to change a tire until they are forced to try.
This guide exists to change that.
Whether you are dealing with a puncture, preparing for a long trip, or simply want to be self-reliant, this article explains how to change a flat tire, step by step, with context, safety considerations, and realistic expectations.
Why Knowing How to Change a Tire Still Matters
Roadside assistance apps are convenient—until they are not. Signal issues, long wait times, remote locations, or simple impatience can turn a minor problem into a prolonged one. Learning how to change a tire step by step gives you control over your situation.
It also saves money.
Many drivers ask how much does it cost to change a tire when calling roadside services or visiting a shop. Costs vary widely depending on location, urgency, and time of day. A basic roadside tire change can range from €40 to €120, and significantly more on highways or at night. Knowing how to do it yourself eliminates that variable entirely.
How Long Does It Take to Change a Tire?
One of the most common questions is how long does it take to change a tire. For someone experienced, the process usually takes 10–15 minutes. For a first-timer, expect closer to 20–30 minutes, assuming all tools are present and conditions are safe.
When people ask how long does it take to change a flat tire, the honest answer depends on:
- Your familiarity with the tools
- The type of vehicle
- Weather and lighting conditions
- Whether bolts are overtightened or corroded
Time matters less than doing it correctly and safely.
Before You Begin: Safety Comes First
Before learning how to change a tire instructions, it is critical to understand where and when you should do it.
Choose the Right Location
- Pull over to a flat, stable surface
- Avoid curves, slopes, or soft ground
- Turn on hazard lights immediately
If you are on a busy road or highway shoulder and feel unsafe, do not proceed. In those situations, calling for assistance may be the wiser choice—even if you know the process.
Secure the Vehicle
- Engage the parking brake
- Put the car in first gear or “Park”
- Use wheel chocks or heavy objects if available
A moving vehicle is the single biggest danger during a tire change.
Tools You Need to Change a Tire
Before explaining how to change a car tire, confirm that your vehicle actually has the required equipment. Many drivers are surprised to discover missing or unusable tools.
You will need:
- A spare tire (full-size or temporary)
- A jack rated for your vehicle
- A lug wrench or tire iron
- Vehicle owner’s manual (for jack points)
Optional but helpful:
- Gloves
- Flashlight or headlamp
- Reflective vest
- Tire pressure gauge
If you are wondering how to change a spare tire but have never checked your trunk, do that first—today, not later.
Understanding Spare Tires
Not all spare tires are equal, and this affects how you proceed after the change.
Full-Size Spare
- Can be driven normally
- Usually matches your existing tires
- Heavier, but more versatile
Temporary Spare (Donut)
- Limited speed (usually max 80 km/h or 50 mph)
- Short distance only (often under 100 km)
- Designed solely to get you to a repair shop
Knowing which type you have determines what you do after the tire change—not how you perform it.
Step-by-Step: How to Change a Tire on a Car
This section focuses on how to change a tire step by step using standard roadside tools. The exact procedure may vary slightly by vehicle, but the principles remain the same.
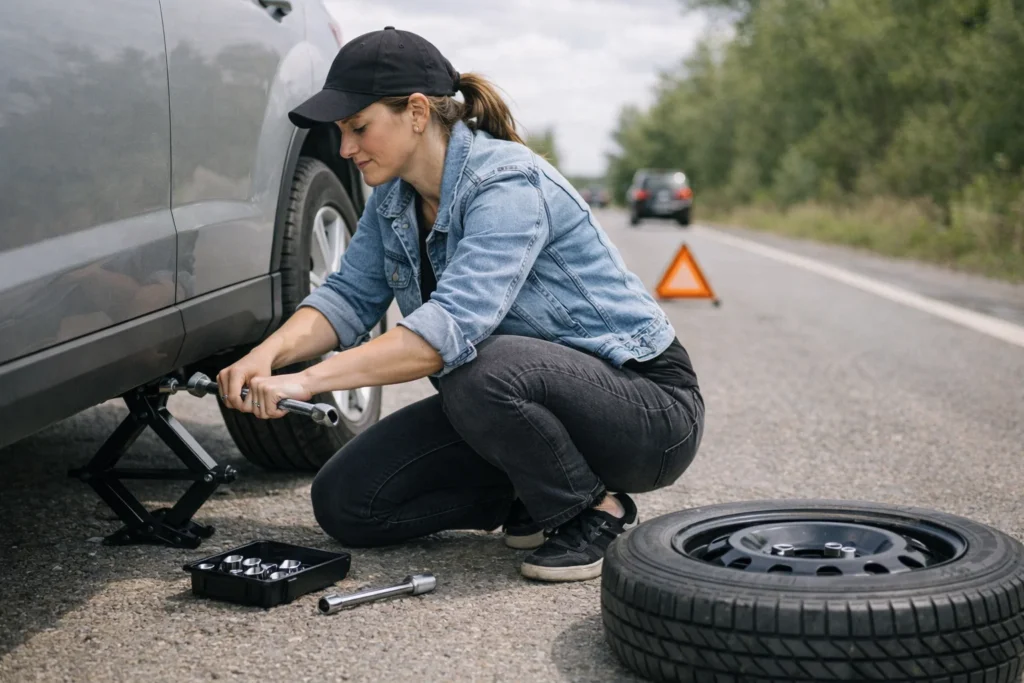
Step 1: Loosen the Lug Nuts (Before Lifting)
Using the lug wrench, turn each nut counter-clockwise while the car is still on the ground. Do not remove them completely—just break the resistance.
This step is critical. Attempting to loosen lug nuts once the car is lifted can cause instability or knock the vehicle off the jack.
If you struggle, use your body weight carefully. Stuck lug nuts are common, especially if last tightened by a shop using pneumatic tools.
Step 2: Position the Jack Correctly
Consult your owner’s manual to identify the correct jack point. Placing the jack incorrectly can damage the vehicle or cause it to slip.
Slowly raise the vehicle until the flat tire is just off the ground. Avoid lifting higher than necessary.
Step 3: Remove the Flat Tire
Now fully remove the loosened lug nuts and place them somewhere visible and secure. Pull the flat tire straight toward you. It may require a gentle tug if it is stuck to the hub.
At this point, many drivers realize why preparation matters. Rushing here leads to dropped lug nuts, imbalance, or confusion.
Step 4: Mount the Spare Tire
Lift the spare tire and align it with the wheel studs. Push it onto the hub until it sits flush. Hand-tighten the lug nuts in a star pattern to ensure even pressure.
This is the core of how to change a tire on a rim in a roadside context—mounting an already-assembled tire and rim onto the vehicle. It does not involve removing rubber from the rim (that requires specialized equipment).
Step 5: Lower the Vehicle and Tighten
Lower the car until the tire touches the ground but still carries minimal weight. Use the lug wrench to tighten the nuts in a star pattern.
Once the vehicle is fully lowered, perform a final tightening. Do not overtighten; apply firm, even force.
After the Change: What Comes Next
Changing the tire is only half the task.
Check Tire Pressure
Temporary spares are often underinflated from sitting unused. If possible, check pressure and inflate to the recommended level.
Drive Accordingly
If using a temporary spare:
- Reduce speed
- Avoid long distances
- Do not delay visiting a repair shop
This answers another common question: how long to change a tire includes not just the physical process, but also the planning afterward.
Common Mistakes to Avoid
- Forgetting to loosen lug nuts before lifting
- Using the jack on unstable ground
- Standing in traffic lanes
- Driving long distances on a temporary spare
Most roadside injuries happen not because people don’t know how to change a tire, but because they ignore environment and safety.
Part 2 — Costs, Limits, and What Most Drivers Get Wrong
By the time a spare tire is mounted and the car is back on the ground, many drivers assume the problem is solved. In reality, a tire change is often a temporary fix rather than a full resolution. Understanding the limits of a spare, the real costs involved, and when not to intervene yourself is just as important as knowing how to change a tire on a car.
This second part focuses on decision-making: what happens after the change, what it truly costs, and why so many people still avoid learning this basic skill.
How Much Does It Cost to Change a Tire?
One of the most searched questions is how much does it cost to change a tire, and the answer depends on who is doing the work.
DIY (Do It Yourself)
- Cost: €0
- Requirements: spare tire, jack, lug wrench
- Best for: drivers who are prepared and in a safe location
This is the least expensive option, but it assumes readiness.
Roadside Assistance
- Cost: €40–€120
- Higher at night, weekends, highways
- Wait times can exceed one hour
Many drivers discover the price only after asking how much to change a tire in an emergency.
Tire Shop
- Cost: €15–€30 (for swapping a mounted spare)
- Additional cost if the tire needs repair or replacement
- Requires reaching the shop first
The hidden cost is time. A flat rarely happens near a workshop.
Changing a Tire vs. Repairing One
A tire change does not always mean the damaged tire is unusable. In some cases, repair is possible.
Repairable Situations
- Small punctures in the tread area
- No sidewall damage
- Tire not driven flat for long distance
Non-Repairable Situations
- Sidewall punctures or cuts
- Blowouts
- Structural deformation from driving on a flat
Knowing how to change a flat tire buys you time, not immunity from further expense.
When You Should Not Change a Tire Yourself
Despite the usefulness of this skill, there are situations where attempting a tire change is unsafe or unwise.
Do not proceed if:
- You are on a narrow highway shoulder
- Visibility is poor (fog, heavy rain, darkness without lighting)
- The ground is unstable or sloped
- You lack the correct tools
Understanding how long does it take to change a flat tire is irrelevant if the environment itself is dangerous.
Why Many People Never Learn How to Change a Tire
It is tempting to assume that people avoid learning because the process is difficult. In reality, the reasons are simpler—and more human.
Overreliance on Technology
Navigation apps, roadside services, and modern vehicles create a false sense of security. The assumption is that help is always available.
Lack of Exposure
Many newer cars hide the spare tire, or no longer include one at all. Without physical exposure, the skill never becomes familiar.
Psychological Avoidance
For some, mechanical tasks feel intimidating. This leads to a mindset where “none of these people know how to change a tire” becomes self-fulfilling.
How Long Does It Take to Change a Tire in Real Conditions?
Earlier, we discussed average times. In practice, real-world conditions change the equation.
| Situation | Average Time |
|---|---|
| Clear daylight, prepared driver | 10–15 minutes |
| First-time driver | 20–30 minutes |
| Night or bad weather | 30+ minutes |
| Stuck or corroded lug nuts | Variable |
When people ask how long to change a tire, they often underestimate the effect of stress and environment.
A Note on Tire Changers and Professional Equipment
Some readers search for how to use a tire changer, assuming it applies to roadside situations. It does not.
A tire changer:
- Removes rubber from a rim
- Requires power, clamps, bead breakers
- Is used in workshops only
If you are learning how to change a tire on a rim at home without machinery, that usually means mounting a pre-assembled spare wheel—not changing the tire itself.
Attempting full tire mounting without equipment can damage the tire or cause injury.
Temporary Spares: What Drivers Often Misunderstand
Temporary spares are not designed to restore normal driving conditions.
Common misconceptions:
- They are “good enough” for daily driving
- Speed limits are optional
- Distance does not matter
Reality:
- Speed limits exist for structural reasons
- Handling and braking are compromised
- Extended use increases risk
Changing the tire correctly does not override these limits.
Preparing Before You Ever Need to Change a Tire
Preparation turns an emergency into a routine task.
Checklist:
- Confirm spare tire pressure every 3–6 months
- Practice loosening lug nuts at home
- Know where the jack points are
- Keep gloves and a flashlight in the car
This preparation answers the question of how long does it take to change a tire before it is ever asked under pressure.
Final Perspective
Knowing how to change a tire instructions is not about independence for its own sake. It is about reducing vulnerability in moments when circumstances are already inconvenient or stressful.
Flat tires are not rare. They are predictable, inevitable, and usually manageable—if the driver is prepared.
Learning how to change a tire step by step transforms a roadside problem into a controlled interruption rather than a crisis.
The skill itself is simple. The value lies in having it before you need it.